5.1 General techniques for tidal and non-tidal waters
5.1.1 Dead reckoning
Whilst you could just head for your objective across an expanse of (non-tidal) open water and hope for the best, it’s better to do a bit of planning first. It’s good to know how long the crossing might take and which direction to paddle in. It’s also useful to estimate where you’ll be at times during the crossing in case you need to make any decisions if things change.
If we know our padding speed and the distance we need to cover, we can estimate the time taken as time=distance/speed. We’ll work in nautical miles and knots when planning crossings, remembering that 1 knot is one nautical mile per hour.
You are planning a multi-day trip in the Moray Firth on the east coast of Scotland. This is an area with relatively little tidal flow, and the trip is planned for neaps.
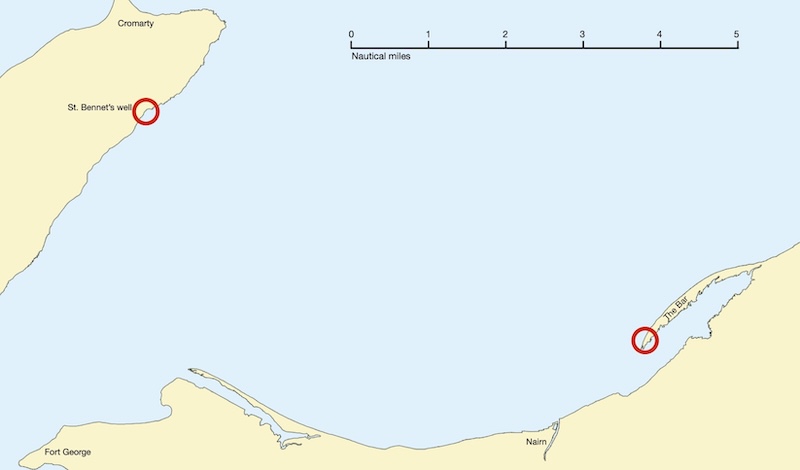
Plan a crossing from St. Bennet’s Well to a planned camp spot at the south-west end of The Bar
The coast east of Nairn that we are heading for is fairly low-lying, so The Bar will likely not be an obvious feature. We choose to aim off a little to the north, so that we can paddle south-west down the bar after we meet the shore to reach our camp spot.
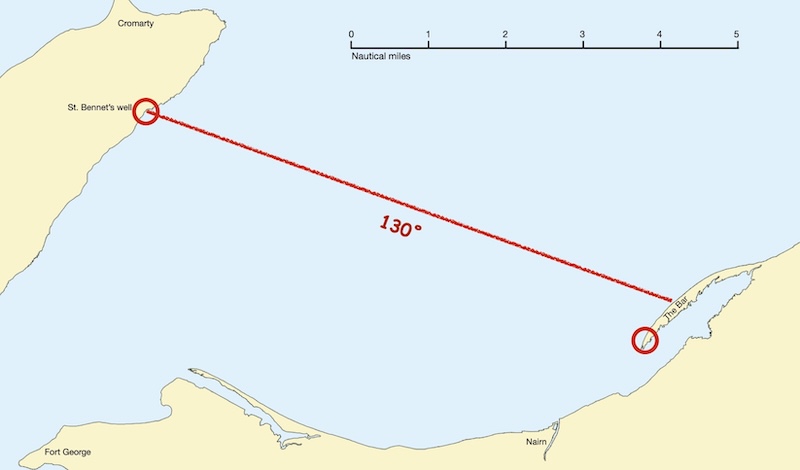
We draw a line on the chart along our planned route for the crossing. We measure the bearing off the map as 130˚ - actually, given that it doesn’t matter exactly how much we aim off, we choose to paddle on a bearing that is a round number to make remembering and following it a little easier.
We can now mark off the line of the crossing with tick marks every mile, using the chart’s scale and a pair of dividers:
 We know that our group travels at 3 knots (accounting for a short break every half hour), so we expect to cover 3 nautical miles during each hour of the crossing. We can annotate our map with the position that we expect to be after 1 hour (3 miles from our start point) and 2 hours (6 miles from our start point. Noting that it’s a little over 7 miles to the coastline, we estimate that it will take about 2 and a half hours to complete the crossing.
This information could be useful if we need to change our plans during the crossing. For example, if a problem occurred after 1 hour, we know that it will be quicker to turn back, or head to the coast on a bearing of 220˚ rather than continuing on our planned crossing.
5.1.2 Transits
Paddling across open water, if we can see where we are going, seems simple. However, as we saw previously, under the effects of tide and/or wind we may not end up where we expect.
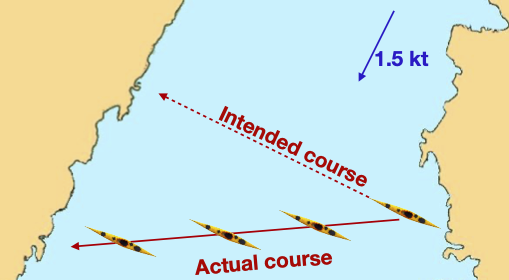
Kayak drifting down-tide of an intended course under the influence of a tidal stream
We need to find a way to correct for the influence of tide and wind.

A ferry glide to correct for the influence of the tidal stream
The easiest way to do this is to look for two objects at the planned destination, one behind another, that line up. If these objects stay aligned, the kayaker must be on track (B). If the kayaker is too far the the right (A), the further object will shift to the right. If the kayaker is too far the left (C), the distant object shifts to the left.
Using a pair of transit markers to check that position is on a straight line across a tidal stream
This technique is known as paddling on a transit (or, in the US a ‘range’).
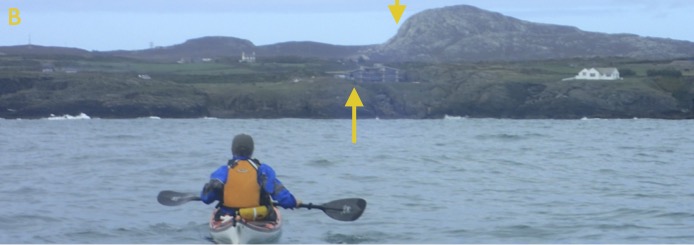
Trearddur Bay, Anglesey has somewhat complex tidal flows. It is helpful to use a transit to cross it.
The transit on this occasion aligned the left edge of a house with the steepest part of Holyhead Mountain, as shown in A.
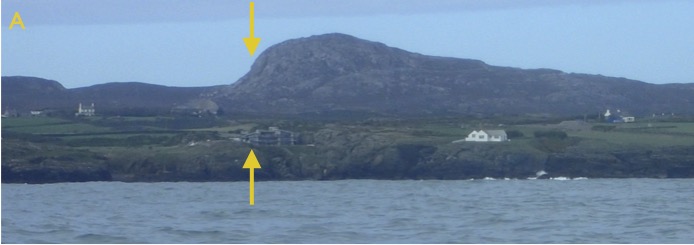
View across Trearddur Bay showing the left edge of a house aligned with the steepest part of Holyhead Mountain
After a few minutes, the background transit (the mountain) was seen to have shifted right in relation to the foreground transit (the house) as in image B.
View across Trearddur Bay taken a little later. Note that the left edge of the house is no longer aligned with the steepest part of Holyhead Mountain.
We had clearly been pushed to the right by tide and/or wind, and needed to point further to the left to maintain our course.
Where pilotage for yachts is especially tricky, you may find posts or other prominent markers, one behind the other. These create transits that mark safe lines through rocky channels. As long as the yachtsman keeps the white posts in line, they can expect to remain in deep water.
However, there’s no need to follow pre-placed transits. Any two features that line up where you want to go will do.
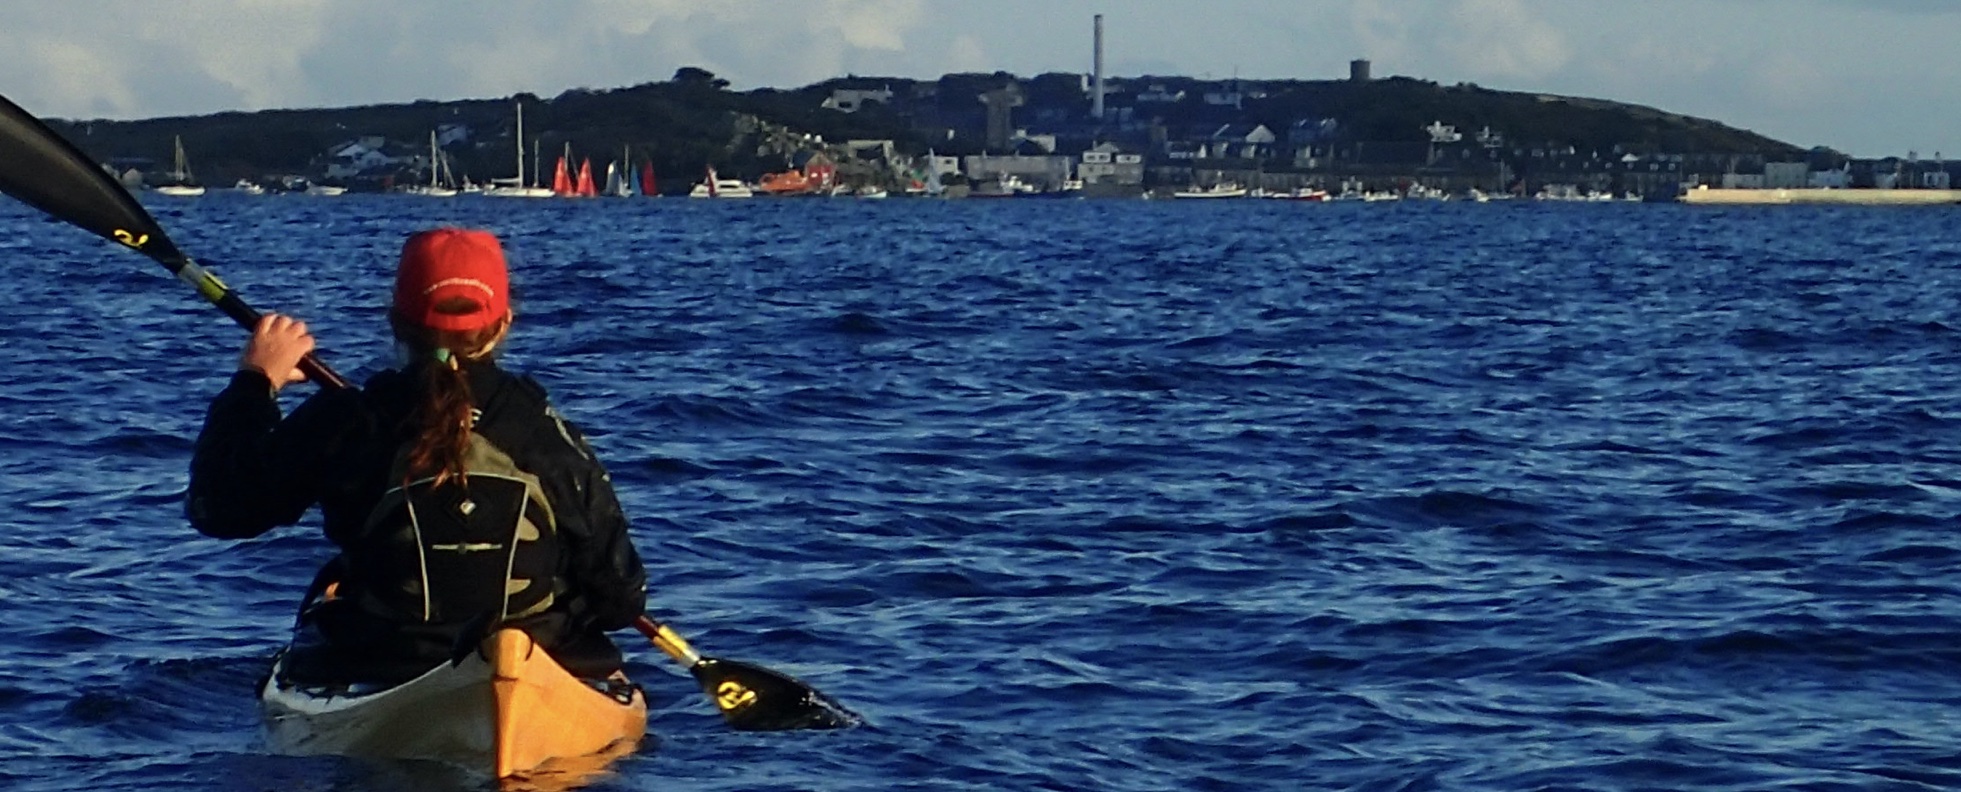
Approaching St. Marys, Isles of Scilly, across open water. The paddler might choose to line up the chimney with one of the buildings as a transit to ensure a straight line course towards the town.
Often, the texture of the rock of a sea cliff provides a satisfactory front marker to use as a transit along with some feature on the horizon of the land behind.
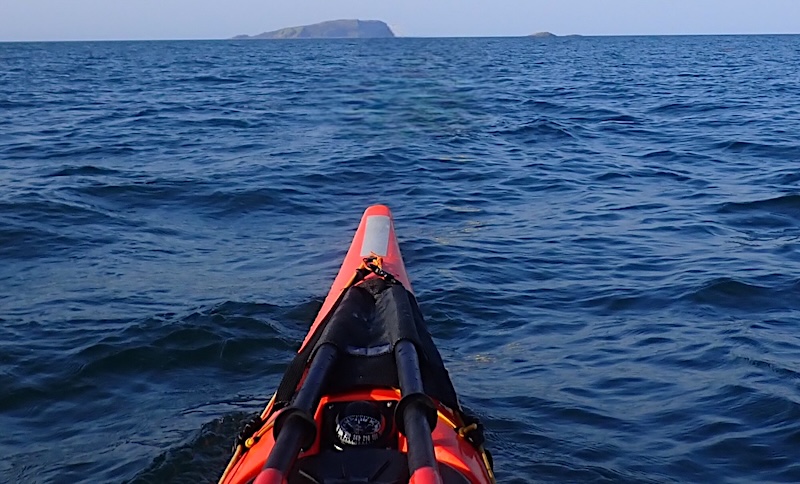
Paddling to offshore islands with no visible land behind presents a particular challenge. Often, insufficient detail can be picked out on the island to form a transit.
Some options might be used in this case:
- Use a reverse transit - i.e. one that is behind you rather than in front of you. Obviously, to make this work, you need to keep looking back over your shoulder
- Take a bearing towards the island and periodically check to see if this bearing remains constant. This tends to give less immediate feedback than the transit method
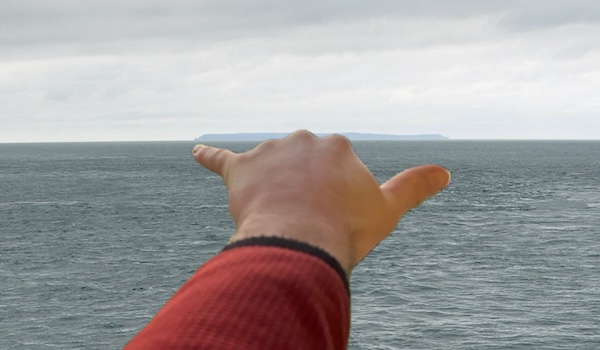
- Use the paddle shaft as a straight edge. Place one eye against the paddle shaft, so that you are looking along it. Point the paddle shaft towards the island - you should see the paddle shaft extending in a straight line from your eye towards the island. Without moving the paddle shaft, turn your head such that the other eye is looking along the paddle shaft in the opposite direction. If you’re on course, the shaft should point towards the point where you departed from the shore.
5.1.3 Following a bearing
If you have worked out a bearing to follow, it’s worth a quick thought as to how to actually follow it on the water. If you simply stare down at your compass or GPS, you’ll likely start to feel seasick pretty quickly, and it won’t be fun! Instead, set your boat to the bearing and look where your boat is pointing - ideally, find some object on the horizon - and paddle towards this. You’ll need to repeat this every few minutes if you anticipate tidal drift to check you’re remaining on the bearing.
The paddler has set a bearing on their steering compass of around 240 degrees. Rather than staring down at the compass, they notice that the boat points towards the right hand end of the island on this bearing - so they can simply paddle towards the island’s right hand side.
When setting bearings, remember that you may want to ‘aim off’ (described in the Navigation section) - briefly, rather than aiming directly at a destination, we might aim slightly to the left or right so that we know which way to turn to find it once we hit the shore.
5.1.4 Fixes*
Position fixing is the art of working out where you are on the sea. This doesn’t need to be complicated. Lots of methods exist. We’ll cover a few here, from the simple to the more complex:
- ‘Single point fix’ - simply noticing that you’re at an obvious landmark, like a buoy or a feature on the coastline.
- GPS systems can be used to fix position. There’s many different ways to use GPS. It’s often easier to program a (destination) point into the GPS to which it tells you range and bearing than to try and interpret coordinates.
- Three point fix - the classic method of position finding in open water. If a paddler can see two landmarks, they can take a bearing to each one. If they draw lines from each landmark along the bearing, they can fix their position where the lines cross. In practise three landmarks are commonly used to reduce mistakes and give a feeling for the likely error in the fix.
On a paddle from St.Agnes to Samson you wish to fix your position. You take bearings with your compass to the Old lighthouse on St.Agnes (171˚), the Star Castle Hotel (74˚) and the Spencers Ledge buoy (287˚). Where are you?
First, we note that this map has compass variation 3˚ W. We hence subtract 3˚ from each bearing. So, for the Lighthouse, we set our compass to 171-3=168˚. We place it on the map, align it to the north-going gridlines and align an edge with the lighthouse. We then draw a line along the edge of the compass. Repeat for the Hotel and the buoy:
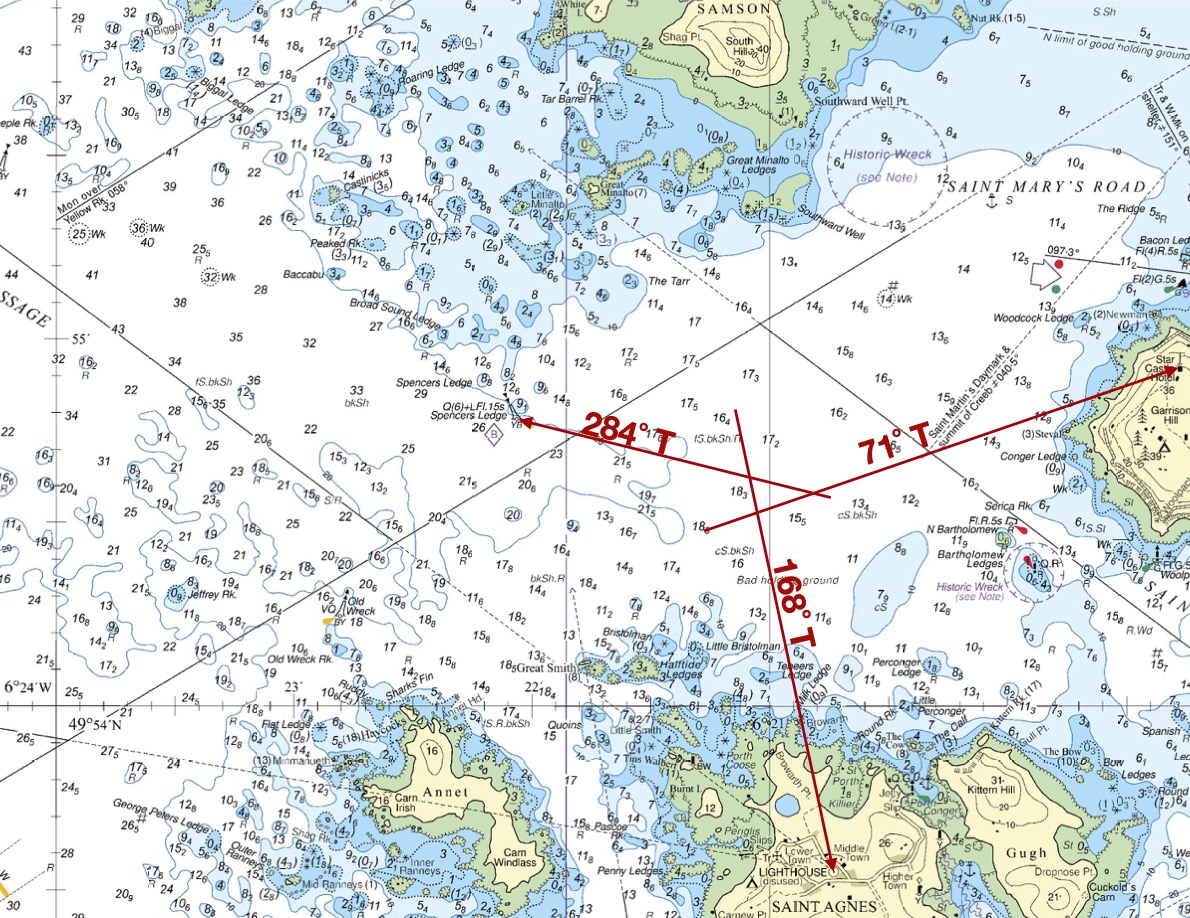
Three point fix.
We are likely to be inside, or near, the triangle formed where the bearing lines cross. If we wish to give our position in latitude/longitude it would be:
49˚ 54.6’ N 6˚ 21.0 WIn practice, 3 point fixes are time consuming and fiddly to do on the deck of a kayak. Given that you often have a fairly good idea of what track you’re on, a single cross-bearing can often be a quick way to get a good estimate of position.
You are paddling from the western tip of Samson towards Saint Agnes, heading towards the lighthouse on a transit. You notice the Spencers Ledge buoy to your right, and take a quick bearing to it using your hand compass - 285˚. Where are you and how far do you have to paddle?
Obviously, you’re at the same place as in the example above - with about a nautical mile left to paddle before you reach Saint Agnes.
Whilst the bearing with the hand compass is likely approximate, given you took it quickly, you can be very confident that you’re on a straight line between the western tip of Samson and the lighthouse if you’ve been following a transit. If you also noticed that the Star Castle Hotel was to your left, in a direction roughly at right angles to your track, you could be fairly confident in your position.
Here’s another example
You are paddling from the small harbour on Bardsey Island to the headland of Trwyn Cilan. You are keeping on track in the strong tidal streams by using a transit between the headland and the hills in the distance behind it. You notice a radio mast on the hills to you left, and use your compass to determine that the bearing from you to the mast is 10˚. Where are you?
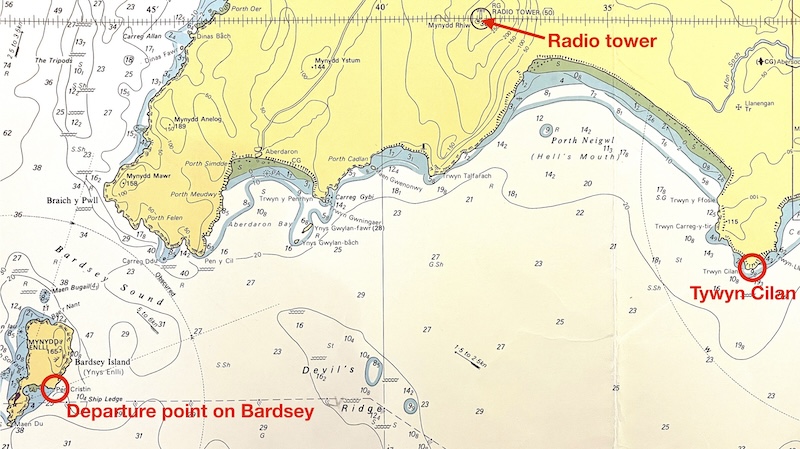
Given you’re following a transit from Bardsey to to Tywyn Cilan, you can be sure that you’re on a straight line between your start and finish points. You might have already sketched this line on your chart before leaving the island:
![]()
We can set our compass to 10 degrees and place it on the chart pointing at the radio mast
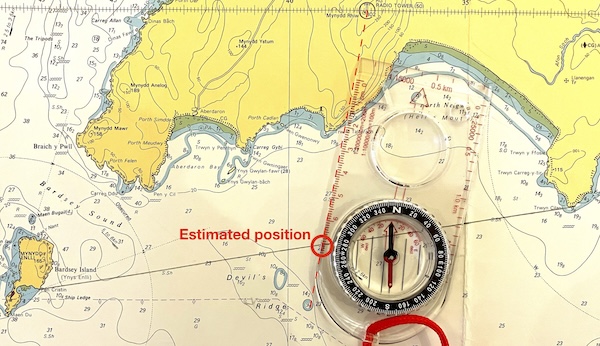
Note that this is intended as a quick and approximate fix - the compass baseplate isn’t long enough to reach the radio mast on the chart and the compass is only set approximately. However, it’s good enough to tell us that we’re about halfway across the crossing.
Chart © Crown Copyright and/or database rights. NOT FOR NAVIGATION. Reproduced by permission of the Controller of Her Majesty’s Stationery Office and the UK Hydrographic Office (www.GOV.uk/UKHO)
5.1.5 Distance off*
Open crossings always seem to involve a lot of time staring at a destination that never seems to get any closer. It’s helpful to have some methods to estimate how far you are from the destination shoreline. As you’re likely fairly confident on your track (and can a bearing to the destination to confirm), knowing the distance still to paddle allows you to fix position. And debating how far you think it is with your companions might be a good way to break the tedium!
5.1.5.1 Resolvable detail method
In his excellent book Sea Kayak, Gordon Brown gives the following hints on how to judge how far you might be from a shoreline:
| Distance | Resolvable detail |
|---|---|
| 100 m | Possible to identify people by facial features |
| 200 m | Can see faces and clothing colours |
| 500 m | Can identify people by movement and shape. Small buoys and paddle blades are visible. |
| 1 km | People seen as dots. Can resolve individual windows on houses. Large buoys visible. |
| 1.5 km | Can see individual trees. Paddle flash, when a paddle catches the sun, can be seen. |
| 2 km | Can see individual houses (and perhaps large trees) and resolve cars from bigger vehicles. |
| 3 km | Limit of kayak-to-kayak visibility. Can separate trees for other vegetation. Paddle flash may still be visible. Flat beaches disappear. |
5.1.5.2 Subtended angle method
This method involves measuring the apparent angle of some distant object and comparing this to the width of the object on your map.
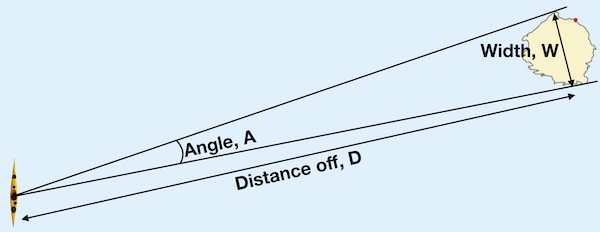
The distance off can be estimated as:
Distance off = 60 X Width / Angle
The angle can be measured by comparing compass bearing to either side of the object, but what makes this method practical for use in sea kayak is that angles can be estimated from holding your hand out at arms length:
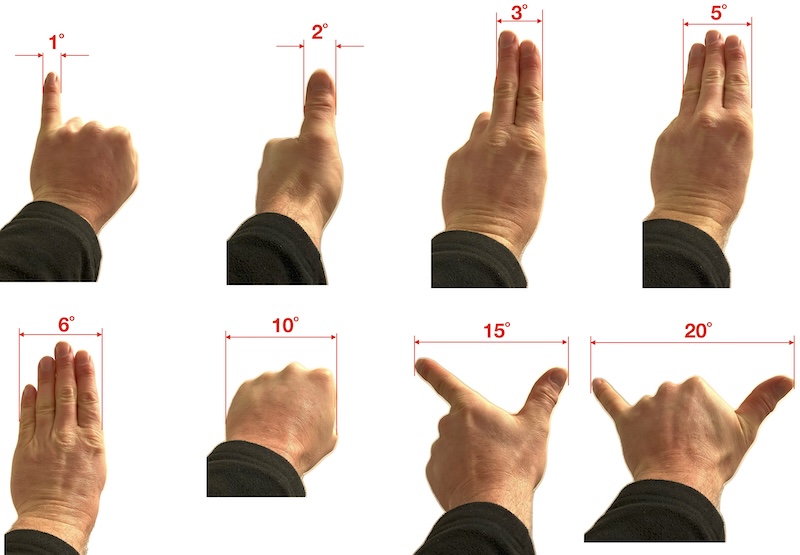
The island of Lundy is about 2.7 nautical miles long, north to south. Whilst approaching Lundy from the east, you notice that Lundy has the same width as your splayed hand thumb to pinkie. How far from Lundy are you?
The angle indicated by your splayed hand is about 20˚. Using the relation:
Distance off = 60 X Width / Angle
Distance off = 60 X 2.7 / 20 = 8.1 nautical miles.
If you intended to use this method, you might have calculated 60 X 2.7 = 162 ahead of time, so that the only mental arithmetic that you have to do on the water is to divide 162 by 20.
Image background: Nilfanion/Wikipedia. Manipulated.
5.1.6 GPS
On a long open crossing, away from shore with few waymarks, using a GPS to navigate is an obvious choice. Traditionalists have long argued that relying on an electronic device that can break or malfunction (or be dropped in the sea) for navigation is unwise. They’re probably right - but nowadays the obvious solution is to take several GPS units with you. If a group of 4 each possess a dedicated GPS unit, a smartphone with wayfinding apps and GPS watches, it’s hard to imagine everything failing at once.
Do be cautious in using smartphones for navigation. Phones aren’t as robust as dedicated outdoor GPS units, can be less accurate and the battery life is often short when using wayfinding apps. Also, make sure you have a backup if you need to phone for help after the batteries run down.
5.1.6.1 Chartwork for GPS use*
Simply reading your position as latitude and longitude off a GPS and transcribing it onto the chart is slow and error prone. A better approach is tell your GPS your destination ahead of time (type it in on the shore, or even at home whilst you’re planning the trip) and get it to tell you the distance and bearing to there.
To make things easier, it helps to do some pre-work with your chart. Marking the chart with a ‘spider’s web’ of bearing and distance information allows to see at a glance where you are from a GPS bearing and distance to travel.
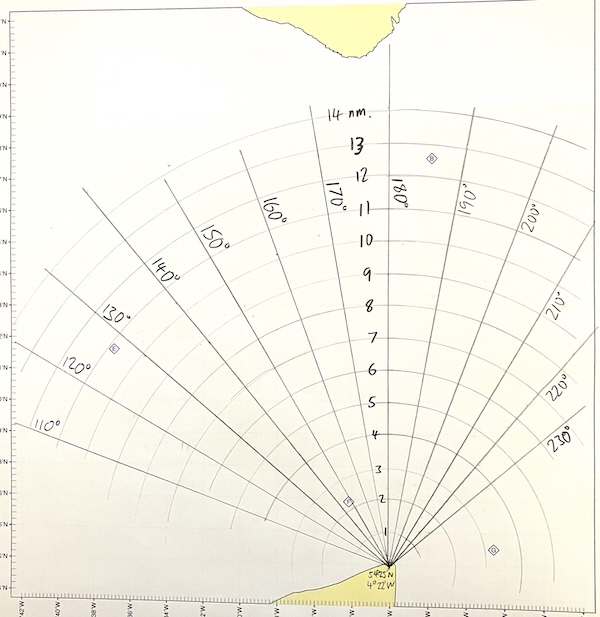
Chart marked up with a ‘spider web’ of bearings and distances to a pre-selected destination